
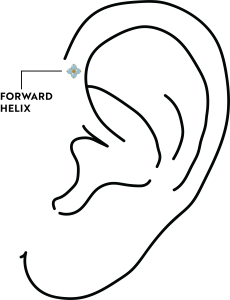
If you love a helix piercing but want to try something new and unique, then a forward helix piercing is for you! Also known as a front helix, or anti helix, the forward helix is located on the outer, upper cartilage directly above the tragus. It is important to discuss placement with one of our Piercing Experts, to ensure you have the correct anatomy for a forward helix piercing.
Forward helix piercing process & jewellery:
A forward helix is pierced using our sterilised catheter needle method. It’s over in seconds! Check out the process below.
@essential_beauty Come pierce a foward helix with us! 🪡🧬 #piercing #pov #fyp #piercinghealing #essentialbeauty #helixpiercing #forwardhelix #piercinginfo #piercinglovers #helix #zodiacjewelry
♬ the weekend – GYU
You’re able to choose from a range of our stunning forward helix jewellery styles:
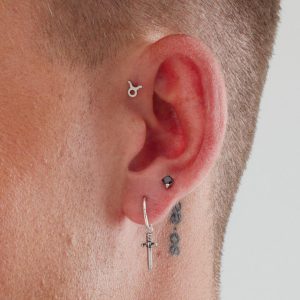
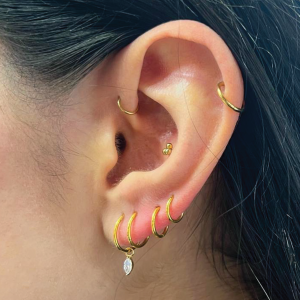
- Flat back stud: best for healing as it allows room for swelling. The flat back is great as it won’t poke the inside of your ear. Perfect for styling with a number of beautiful flat back attachment styles.
- Hoop/ring: a popular option which is perfect for styling your ear curation. You are also able to add charms to a hinged ring to really elevate your look!
You can upgrade your jewellery with our ear piercing needle board, which allows you to choose from hundreds of cute styles. You can also be pierced with silver, gold PVD, rose gold PVD or black PVD surgical steel jewellery for free! Check out our range of forward helix piercing jewellery here.
Pain level & Healing time:
Pain levels are different for everyone and will depend on the person’s pain tolerance. Cartilage piercings tend to hurt more than soft tissue piercings, so we believe the pain level for a forward helix piercing is about a 5/10, similar to a normal helix piercing. Remember to breathe during your appointment, eat beforehand and drink plenty of water, so you’re feeling as relaxed as possible. If you have any concerns, you can also chat to one of our Beauty Therapists! You can also prepare for your piercing appointment by reading our blog.
Healing times are also different for everyone, as it will depend on the person’s anatomy and aftercare. For a forward helix piercing to be completely healed, it can generally take 12-24 months before leaving any jewellery out of the piercing.
Signs your forward helix piercing may have healed:
- It has been 12-24 months since your piercing appointment*
- There is no more discharge or redness
- The piercing is not tender to touch
- The jewellery is loose and moves somewhat freely
*Please note: these times are general, and healing varies for the individual. If you are unsure, visit your Piercing Expert to consult and advise.
Jewellery changeover period:
You will be able to change your forward helix piercing jewellery over 6-12 weeks after your piercing appointment, however, it is important to remember that jewellery changeover times and healing times are two very different things. After 6-12 weeks, you’ll be able to remove your forward helix piercing jewellery for a short time for a changeover. Your forward helix piercing may begin to shrink if the jewellery is left out for too long. We cannot give an exact time for how long you can remove your jewellery before it becomes difficult to reinsert.
At Essential Beauty, every piece of jewellery purchased comes with a free jewellery changeover! Ask your Beauty Therapist at the time of purchase.
Recommended aftercare:
It is important to follow recommended aftercare information from our Piercing Experts. For weeks 1 & 2, spray Sterilear Step 1: Clean front and back twice a day. Spray sparingly and rinse after use. Step 1: Clean contains the optimal concentration of salts to promote healing and prevent bacteria from forming around the piercing.
From weeks 3 onwards, move onto Sterilear Step 2: Care. Spray front and back twice a day. Step 2: Care is formulated with aloe vera, lavender, and vitamin E to soothe the skin while promoting healing.
If you want to learn more about caring for your piercing, check out our piercing aftercare tips and tricks blog, or visit our Piercing Experts in salon if you have any questions!